
Welcome to the First Official Recipe Post on PianoPantry.com!
Can you believe it?! I’ve talked about cooking and recipes for years, but always as a fun little side note to all the piano-teaching and digital-organization talk. I never really imagined I’d have an actual recipe blog.
I’ve shared a few things like Homemade Caramel Corn and Homemade Hot Cocoa – both as Christmas gift ideas for students.
BUT, they were just simple blog posts without a formal recipe layout.
We’re about to get real fancy here. Ha!
Looking back, I think I made it feel like more of a “thing” than it needed to be. Everything these days seems to have a learning curve, right? You can’t just decide to start posting recipes without it turning into a 10-hour rabbit hole of figuring out plugins, settings, formatting… yada yada yada. It can be exhausting!
But here we are. I finally decided it was time to start sharing a few of my favorites here on the site—because I know so many of you love that side of my content, and honestly, I’m ready too.
The funny part? My first “recipe” isn’t much of a recipe at all—it’s more of an assembly project.
A Simple, Spooky Treat for Fall
If there’s one type of food-related thing I’m not crazy about, it’s crafty, fiddly baking (like decorating sugar cookies). But last year, for my studio’s fall recital, I wanted to make a couple of fun, fall-themed treats. I tried two: Nutter Butter Ghosts and Rice Krispie Candy Corn.
The Rice Krispie version? Way too tedious and complicated. One and done for me.

But the Nutter Butter Ghosts? So easy—and so cute—that I know they’ll be a staple in October for years to come.

Tips for Making Nutter Butter Ghosts
After making them, I learned a few things worth noting:
- Buy extra. Even though the recipe calls for one bag of cookies and one bag of white chocolate chips, grab two of each just in case. I broke several cookies while dipping early on, and my first batch of melted chocolate seized up because I overheated it.
- Be patient with the melting. Use 10–15-second bursts in the microwave, and stir every single time. Trust me—it makes a big difference!
- You won’t need a full bag of mini chocolate chips. Just a tablespoon or two for the eyes will do.
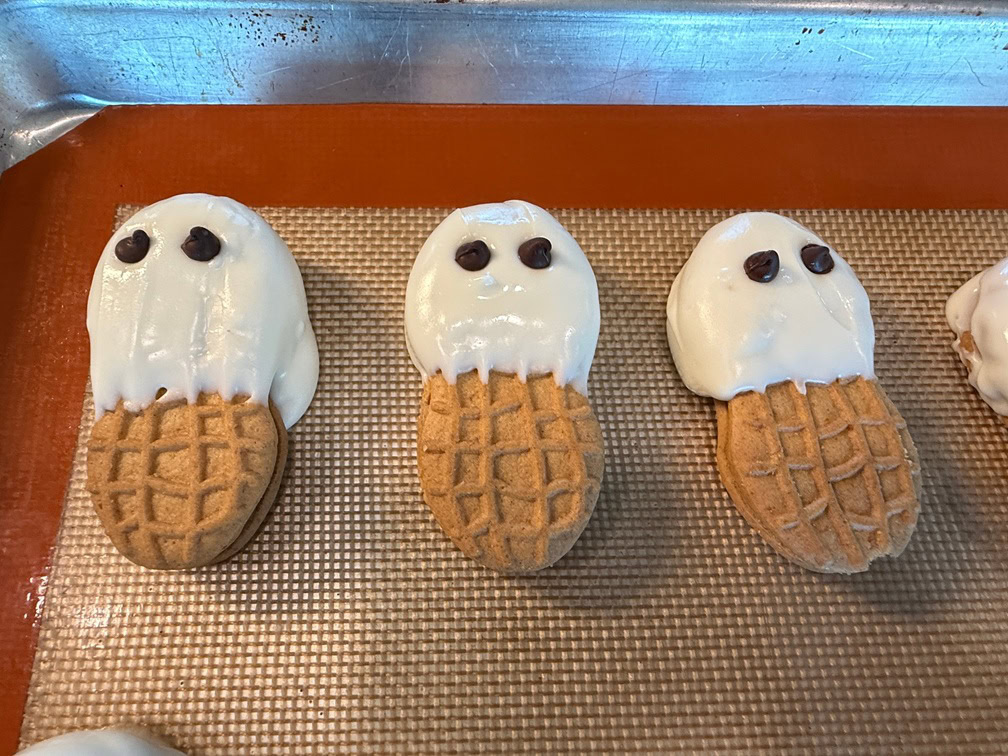
- The white chocolate is thick. It doesn’t drip easily, so after dipping, stand the cookie upright and give it a little downward shake to help it settle nicely. If you skip that step, they’ll still be cute—but a little less “ghost-like.” (see the first photo below)
- My best-looking batch came after a few tries (see second photo below).
If you search “Nutter Butter Ghosts” online, you’ll find all kinds of variations—some with icing eyes or “mummy” versions using a piping bag for those back-and-forth lines. If you’re artsy like that, go for it!
Me? I like to keep things simple.
I used a glass measuring cup for dipping, thinking the deeper bowl would help—but honestly, it didn’t make much difference. I still found myself swirling the cookie around to coat it. A regular glass bowl would be fine.


A Fun and Easy Halloween Treat
These cookies make a great, easy treat for a Halloween-themed recital, group class, or even just for fun during Halloween week (like I’m doing this year).
Important disclaimer: Be sure to check for food allergies—especially nut allergies!
Nut-Free Alternatives: Try Biscoff cookies, Milanos, or Vanilla Wafers instead! Each offers a fun twist on the classic ghost shape.
I’d love to hear from you! What are your favorite Halloween treats to make—or any fun variations on this one?
Looking for more Halloween-themed ideas?
Favorite Sheet Music Piano Solos for Halloween
Halloween Favorites: Games, Resources, Graphics and More
Halloween Classical Music Playlist
Equipment Favorites
Here are some items from my favorites that you may have noticed in this post:


Ingredients
Equipment
Method
- Line half sheet pan with Silpat or parchment.
- Melt White Chocolate Chips in a medium glass bowl for 30 seconds. Stop and stir (even if it doesn't look like it's melting yet). Put in for another 10-15 seconds. Stop and stir. Repeat 1-2 more times until fully melted.
- Gently holding onto a cookie, dip one side into the melted chocolate 1/3 – 1/2 way until all edges are covered. Lightly scrape the chocolate off one side.*
- Hold upright and give it a good shake to get the chocolate to drip down the cookie.
- Place on the pan. Do 2-5 cookies at a time and then add the mini chocolate chips for eyes before the white chocolate starts to harden.
- Let sit for 15-30 minutes until hardened.


2 Responses
Love this idea!! I do a lot of recipes with dipping chocolate and here’s a couple things I have learned:
1. If you set your microwave at 50% power, you can melt those chips at 30 second intervals and it goes faster.
2. I add a little Crisco to my white chocolate to make it smoother and thinner. A little goes a long way!
Oh, that makes total sense! I figured there was a way to help with that but I don’t do a lot of sweets type of cooking outside of cookies so I wasn’t sure. Thanks, Beci!