Note: Due to the screenshots, this post is best experienced on a desktop rather than on mobile.

In the next few months, many of us will start thinking about what our roster for the upcoming school term will look like.
For years, I ran my studio calendar from August to July with a school-term/summer tuition structure.
Families paid a fee for the school year (August – May), then either paid separately for summer lessons, depending on what I was offering that year, or a “holding” fee to keep their spot if they opted out of summer lessons.
A couple of years ago, though, I shifted to a flat monthly tuition model for the entire year. Now, tuition is spread evenly across 12 months and includes four summer lessons in June and July. My teaching year runs from June to May.
I ultimately moved to the 12-month model to keep things simple. I got tired of sending bills for summer lessons and the return of the school term. Once they’re set up, they’re set up until they quit lessons.
Plus, it provides a steady, consistent income for me, too.
→If you would like to hear more about that move, check out episode #117 of The Piano Pantry Podcast – Embracing Macro and Micro-Adjustments in Your Studio
So with that in mind, here’s my process for onboarding new students.
Lesson Interest Form
Most people these days reach out through the contact form on my studio website.
There was a stretch of a few years when I wasn’t accepting more than one new student a year (if that). I’m still pretty much in that phase. I was getting so many inquiries that I eventually removed the contact form altogether and replaced it with a simple note explaining that I wasn’t taking students.
I did include one small caveat: if someone felt they had a special situation, they could email me directly. I also provided information on where they can continue their search for a teacher, including our community arts council, and a Google spreadsheet that lists all of the teachers in the county that we jointly maintain.
After a couple of years, though, I realized I didn’t love that system. It put the burden on families to decide whether their situation was “special.”
So I brought the form back.
Now, I let ALL interest forms come through and personally reply to each one—even if it’s just to say I’m not currently accepting students. This way, I get to decide whether something stands out that might warrant an exception, such as a transfer student, a personal referral, or someone looking for daytime lessons.
For my form, I use Tally.so and embed it directly onto my contact page. I like Tally because it allows conditional logic—an easy “if–then” setup that customizes the questions people see.
For example, if someone selects that they’re an adult student, they’ll see one set of questions. If they choose a school-age student, they’ll see a different set of questions.
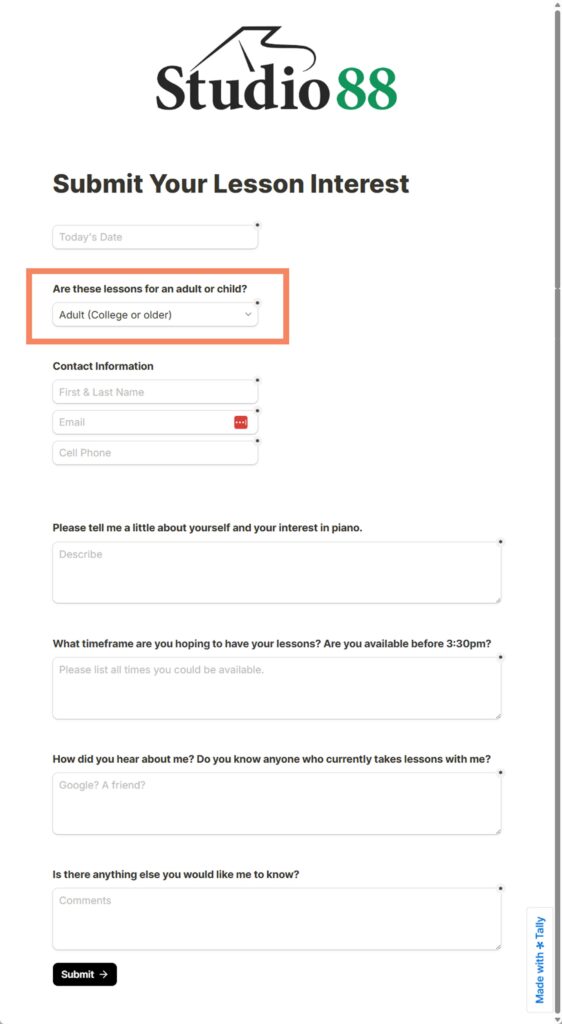
Questions on both forms include:
- Date
- Contact information (name, email, cell)
- What timeframe are you hoping to have your lessons? Are you available before 3:30 pm?
- How did you hear about me? Do you know anyone who currently takes lessons with me?
- Is there anything else you would like me to know?
Specific questions on the adult form include:
- Please tell me a little about yourself and your interest in piano.
Specific questions on the student form include:
- Student Information (name, birthday, school)
- Please tell me a bit about your student. Do they display interest in lessons? What is school like for them? Have they taken other music lessons? Are there any medical conditions I should be aware of?
Tracking Lesson Inquiries
The other reason I love Tally is that it integrates beautifully with Notion, which is my productivity and note-taking app of choice.
When someone submits an interest form, their responses are automatically sent into a database in my Notion account. You can think of a database as similar to a spreadsheet, except that each column has a designated format like a number, a currency, an image, a date, a tag, basic text, and so forth. Each row is an entry.
At the same time, I receive an email notification that a new inquiry has come through. It basically turns my contact form into a mini CRM (Customer Relationship Management) for my studio.
Here’s what that looks like on the Notion side. This is a “page” in Notion.

On the page, you can see the breadcrumbs at the top, which show exactly where this lives in my workspace. This Lesson Interest Form and Waiting List page sits inside my Piano Studio Dashboard, which lives inside my main master Dashboard—the home base for everything in my account. If you’re trying to picture it, think of it like your computer’s file manager… or a set of Russian nesting dolls. Pages live inside of pages.
At the top of this page, I keep a direct link to my Tally form so I can open or share it quickly anytime.
Right below that is a simple notes section where I jot down little reminders to myself. These are usually informal things you’d never want inside a formal database—notes like:
“A current studio mom XXX shared my name with someone XXX, but mentioned this family might be a tough fit.”
Keeping a space to make random notes to myself helps tremendously—especially when someone waits six months to reach out after first hearing about me. By then, names and details can get fuzzy, and this gives my memory a jog.
Below the notes section is the database where all form responses from Tally land. I’ve had to blur our actual details on the page, but you can at least see the headings for each row, which correspond to each block on the inquiry form. Remember, each row represents one inquiry/contact entry.
- Child or adult
- Student name
- Inquiry date
- Waiting list status
- Contact name and email
- Birthday and age
- School
- Availability
- Referral source
- About the student
- Comments
- Recent communication notes
Waiting List Communication
Typically, I’ll reply to an inquiry by email and let them know I’m not taking students and direct them elsewhere. After that, I simply drag their entry into a second database on the same page that serves as my archive of past inquiries.

I don’t delete those right away—I usually keep them for two or three years, just in case someone circles back or I need to reference something later.
If they specifically ask, I will share my current fees and a brief overview of what lessons with me look like but don’t offer details unless they inquire.
I try to not keep a waiting list—but sometimes they ask, and I’m happy to add them. I don’t worry about meeting with them in person before marking them as “waiting.” That only comes when I truly am onboarding students. I just tag them as waiting in my INQUIRY database. Most of the time, they end up finding someone else anyway.
If an inquiry feels like someone I might make an immediate exception for, I’ll schedule an in-person meeting right away. Other than that, I just touch base with those on my waiting list once a year.
→ For more on managing a waiting list, check out episode #022 of The Piano Pantry Podcast – Lessons from a Long Waiting List.
Onboarding New Students
In March, I start by asking all current families to let me know their intentions for the upcoming year. Then, in April, I start touching base with students on the waiting list to gauge their interest in any openings I may have. Then, in May, I do onboarding.
I don’t want to get too deep into the weeds about what happens during in-person meetings, but they’re pretty lighthearted and low-pressure. We start by chatting and getting to know each other face-to-face, spend five or ten minutes at the piano, and then I walk them through a few of my nitty-gritty policy details.
Most importantly, I make it clear that the meeting is a chance for both of us to see whether it feels like the right fit. There’s no pressure to decide on the spot.
I send a hard copy of my policies home with them (which I am going to rename a “Welcome Packet”). I ask them to go home and think it over, and then about 48 hours later, I follow up.
At that point, I’ll let them know whether I have a spot available and can take them on or if I need to graciously point them toward another teacher so they can continue their search.
If we both decide to move forward, I send my formal registration form and set up their payment links.
Automatic Payment Processing
I don’t want to get into details on payment processing in this post, but I will give you a brief overview of where I’m at.
For years, I used Coinhop, but in December 2024, they announced they were closing their doors, so I went looking for a new solution.
→ For more on that, check out episode 149 of The Piano Pantry Podcast – Auto-Payment Processing Options
I landed on Helcim for their slightly lower fees.
Frustratingly, Coinhop did a 180 two months after saying they were closing and decided to just raise their fees (why didn’t they just do that initially?!) Fortunately, the new fees are still better than industry standards, but after spending an entire day researching and producing a podcast on the topic, I was too frustrated with Coinhop to go back, so I continued my new path with Helcim.
After a year with Helcim, though, I’m not sure I’m ready to recommend this option. I’m sure I will do a follow-up podcast episode to #149 in the next year, once I make a decision this Spring. After getting everyone onto the new system, I wanted to give it a fair shake for a full year before making any decisions.
→ For more on Coinhop, see this post: Save Time and Money Taking Payments with Coinhop. Note that this old post highlights their new old structure.
Registration Communication
I charge a one-time registration fee equal to one month of tuition. In my mind, that fee covers all the behind-the-scenes onboarding work: ordering music, setting up payments and materials, organizing their files, and even a few welcome goodies like a studio T-shirt and canvas bag.
One small bonus I try to offer new students—especially younger ones—is a handful of extra lessons during their first summer, usually two to four extra sessions, to help them build momentum.
I do not charge extra for this, so I don’t emphasize it or feel obligated to make it happen. It’s simply a “nice if it works out” kind of thing. Sometimes our schedules align, and sometimes they don’t,
These days, I try to keep emails as short and to the point as possible. Instead of long explanations, I send quick, scannable messages. I’ll often use emoji numbers instead of bullet points so parents can skim key details at a glance.
Something like this:
Dear parent,
Here’s what I need next from you to get you going:
- Please fill out this registration form for STUDENT NAME.
- Your $xxx monthly fee (12 payments for annual tuition) runs from June 1, 2026, through May 1, 2027.
- The one-time registration fee (equal to one month’s fee $xxx) will be added to the June 1 autopayment, so June 1 will be higher at $xxx. Starting July 1, and thereafter it will be $xxx.
- Each student gets 4 lessons over June and July. Please fill out this brief form by FRIDAY, MAY 16 to let me know your summer schedule before I open lesson times.
- I try to give new students a couple of free extra lessons within the first few months to help them get going more quickly. So if possible, we will try to get a couple more in this summer. If that’s too much, we can wait until the start of the school term, or just not worry about it.
Studio Registration Form
The registration form is also done through Tally. That being said, when I first started with Notion they did not have forms. They now have Forms built into their databases that will auto-generate based on your database setup. I have not had a reason to switch over yet, so I have kept mine in Tally.
Here’s my registration form:

Yes, there is some overlap in the questions from the initial inquiry form, but there are certain questions I feel I need to know at both points, so I just ask them again instead of trying to save the information from the initial contact form.
Just like the interest form, as soon as this is submitted, I get an email, and the data is sent directly into my Student Details & Lessons database in Notion.
You don’t see every item from the form in the database list because I can choose which items to show in each view. The details are still there, they’re just hidden and not front-facing.

Another view I also use is called a “gallery” view. It’s the same database and the same information, just a different front-facing view rather than the “list” layout you see above.

(Did you notice I have more boys than girls? It’s been like this for quite a few years!)
If you click on one of their faces, it will open their individual student details & lessons page, which includes notes, repertoire tracking, and a database dedicated to their weekly lessons.
→ This student’s details page for tracking notes and repertoire is one of the many templates that are included in the Organize Your Life with Notion workshop.
So when the parent fills out the registration form, the details are automatically sent into this database, which gets the student’s page started for me. I add the student photo and the lesson notes database later.
More Onboarding Emails
Once lessons have started, I send a series of emails to new parents in small snippets. Just as you sometimes get onboarding emails when you join a new email list (like a get-to-know-you series), I have set up a series of emails to “drip” out important information in small snippets.
Some emails depend on the student’s age and on factors such as whether I am using a practice app for assignment delivery. At this time, I am not.
I keep a page in Notion with all of these email templates. Once they register, I schedule most of them right away.

The “Dedicated Topics” are ones that I send to the whole studio almost every year (if I remember – ha!)
Contacts & Calendar for Home Automation
Lastly, I add the new student contact email to my studio group in Google Contacts (called “labels” in Google Contacts). This allows me to simply type the group name in the “BCC” field (please, no studio group emails in the TO or CC fields!) and have it autopopulate everyone’s email. In my case, I just type “Studio 88.” So easy!
Once we lock down a lesson time, I also add the lesson appointment as a recurring event in my Google Calendar. I keep several calendars in Google, which not only let me toggle them on or off in the calendar view (which I rarely do), but also allows me to set different colors for each event, and it also allows us to connect our home automation to one of them.
I keep a personal calendar (light blue), a birthdays and anniversaries calendar (purple), a work calendar (dark blue), and a home events calendar (green). The home events calendar lists all my lessons as well as events that have people over to our house. It integrates with our home automation system and will turn the lights on or off 20 minutes before or after an event. It’s been so nice to have our front porch and entryway lights come on and off automatically for my studio schedule, so I’m not doing that manually every day. Yea!
More Ideas for Student Onboarding
I hope you found this post helpful in seeing the start-to-finish process. Remember, there’s more than one way to do things! Take what little bits of inspiration you can from what I do and make it your own.
If you would like even more inspiration on onboarding new students, Joy Morin also recently published a post on how she onboards students in her piano studio. Check it out here: How I Onboard New Students.
Learn More About What Notion Can Do For You
If you’re curious to learn more about Notion, my friend Joy Morin and I are running a FREE webinar on Tuesday, February 10, from 12:30-1:00 pm on Zoom. A replay will be available for those who register, but you’ll want to come live because we will have a special giveaway at the end. Must be present to win.
CLICK HERE TO REGISTER HERE FOR THE WEBINAR

Organize Your Life With Notion Workshop
If you are ready to dive into the world of Notion, Joy and I run a workshop called Organize Your Life with Notion. In this 3-day workshop, we give you all the tools you need to kick-start your new customized workspace in Notion.
Registration for the next workshop is open.
DATE: Friday, February 27, March 6, March 13
TIME: 12:30-2:30 pm ET (replays available)
DETAILS: Visit the workshop registration page for more details.
DISCOUNTS:
Early Bird Discount through February 15 – Get $60 OFF using Code NOTION60 at checkout.
Extended Discount through February 25 – Get $30 OFF using Code NOTION30 at checkout.
Learn More About Notion
If you would like to hear more specifics on how it has changed our and other teachers’ lives, check out the following content:
JOY’S BLOG
An Intro to Notion – A Customizable Digital Workspace to Organize Everything in Your Life
Your Qs Answered, and How I Use Notion to Manage My Piano Studio
Joy Tries to Convince Daniel to Try Notion
40 Ways to Use Notion as a Music Professional
AMY’S BLOG & PODCAST
A Better Option: My Move Out of Evernote & Into Notion
105 – Evernote vs. Notion
109 – Joy & Amy: Ways We Used Notion This Week
134 – How Jill Gilbert is Using Notion to Manage Her Studio
135 – How Stephanie Thompson is Using Notion to Manage Her Studio
136 – How Valerie Merrel is Using Notion to Manage Her Studio
175 – Teacher Talk with Joy Morin
177 – Stepping Up Your Tech with Donna Hinkley
THE TOPCAST PODCAST
409 – Using Notion to Organize your Studio and Life with Joy & Amy